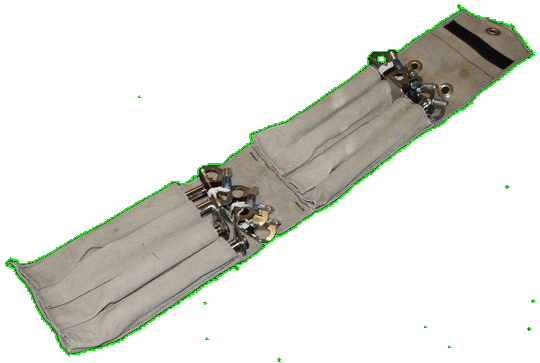
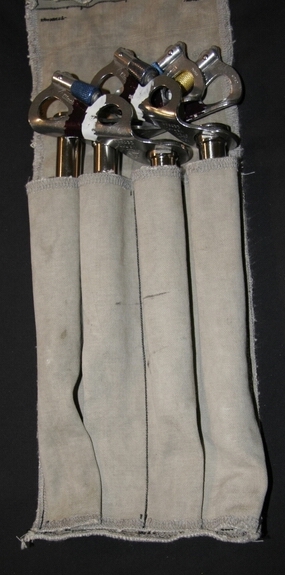
There is only one company out there making bags to store ice screws, and that is Black Diamond. They are nice bags, but rather pricey and only come in neon orange. So I designed my own, the instructions are painfully thourough, hence why it looks so long.
If you want me to make you one, no problem. $20 plus postage (but you do get to specify color). If you want to make one, check it out: (I didn't list thread, scissors, sewing machine, etc in the materials). Use a medium to thicker fabric (not thicker than than canvas, but not cotton sheet thin).
Materials
- Fabric Pen/pencil, or sharpie (in the color of your fabric) - your going to draw on your fabric, but I doubt you want the marks to be permanent.
- Iron - Optional, but makes nice creases and edges.
- 11" x 32" - Fabric piece A (outside)
- 11" x 9" - Fabric piece B (sleeve 1)
- 11" x 9" - Fabric piece C (sleeve 2)
- 2x 9" x 1/2" Flat webbing - Gear Loops (E and F)
- 5" x 1" Male velcro - Prickly side (G)
- 5" x 2" Female velcro - Soft side (H)
Instructions
Cutting
- Sorry the numbers don't work out so well. If your material is 1m wide then 32" x 22" is the most efficient. If it's 2m wide, 11" x 50" is the best.
- Now cut out parts A, B, and C. Either way, it should only be 2 cuts.
- If you didn't cut the webbing into two 9 inch pieces, do so now. Melt the ends slightly so they don't fray while your at it.
- If you didn't cut the velcro into 5 1/2 long inch pieces, do so now as well.
- Put down the scissors.
Marking Piece A
- Fold piece A in half lengthwise (it will now be 5 1/2" by 32"...make sure the nice side is outside).
- Pick up your iron and iron piece A flat. Whew! that was hard.
- Put down the iron.
- Pick an end of piece A, this is now and forever the bottom.
- Make a mark 9 inches from the bottom of piece A along 1 edge.
- Make more marks at 14, 23, and 31 inches from the bottom of piece A.
- Repeat the last 2 instructions up the other edge.
- Turn the 8 marks you just made into four horizontal lines. It should look like this:

- Across the bottom make a mark 1/4 of an inch in from either edge.
- Across the bottom make a mark in the exact center (2 3/4").
- Finally, across the bottom make a mark 1 1/2" inches in from either edge. The end should now look like this:

- Repeat the last 3 instructions at the 9, 14, and 23 inch marks.
- Finally, connect the dots between the bottom and the 9 inch mark, and between the 14 and 23 inch marks. It should look like this:

- Almost there, I swear. Flip piece A over.
- From the bottom (you remember which end that was right?), measure up one side 14 inches, and then in to the middle 3/4 of an inch and make a dot.
- From the bottom (you remember which end that was right?), measure up 23 inches, and then in 3/4 of an inch and make a second dot.
- Connect your 2 dots.
- Repeat the last 3 instructions up the other edge to end up with this (dotted lines are on the flip side):

- One last mark for piece A.
- From the bottom, measure up one side 2 1/2 inches and make a dot.
- Measure up the other side 2 1/2 inches and make a second dot.
- Connect your 2 dots. Your finished marking piece A!
- Put down the pen, take a moment to relax and get something to drink.

Marking Pieces B and C
- Lay piece B face down.
- Put your finger on one of the long (11") sides. This now now and forever the bottom.
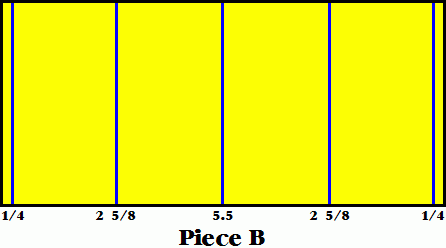
- Across the bottom, make a mark 1/4 of an inch in from either edge.
- Across the bottom make a mark in the exact center (5 1/2").
- Finally, across the bottom make a mark 2 5/8" inches in from either edge. The end should now look like this:

- Repeat the last 3 instructions at the top (opposite edge from the bottom) of piece B.
- Finally, connect the dots between the bottom and top. It should look like this (well, more square, but otherwise the same):
- Now repeat this section for piece C.
Sewing - Lock the Edges
- Sew a nice and dainty zig-zag around all 4 edges of piece A (piece A is now permanently double thick), piece B, and piece C.
Sewing - Back of Piece A
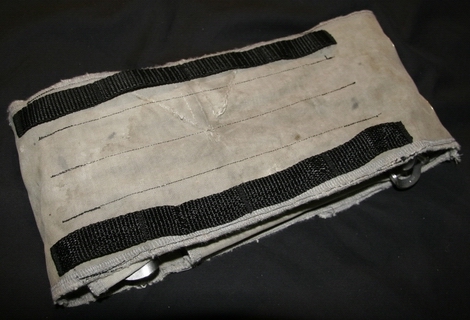
- Remember those 2 vertical lines you drew on the back of piece A? Take one of your pieces of webbing and lay it along that line, nicely centered.
- Sew another nice and dainty zig-zag at the bottom (going back and forth 2 or 3 times) of the webbing, attaching it firmy to piece A at the 14 inch mark.
- Sew another zig-zag at the top (going back and forth 2 or 3 times) of the webbing, attaching it firmy to piece A at the 23 inch mark.
- Sew another three zig-zags at 1/4, 1/2, and 3/4 of the webbing, creating your gear loops.
- Sew the other piece of webbing onto the other line following the last 4 instructions.
- Now take your female velcro and place the bottom edge along the final line on the back. There should be a 2 1/2" gap between the bottom of piece A and the velcro.
- Using a boring straight line stitch, sew all 4 edges of the velcro down and then do an X through the middle.
- If all is good, you should see this:

Sewing - Making the Tubes
- Flip over piece A.
- Take piece B(nice side up) and align the 9" side to the edge of piece A between the bottom and the 9" mark.
- Sew the side of A and B together (between the edge and the 1/4" mark).
- Now line up the next 2 lines on A and B (the 1 1/2" line on A and the 2 5/8" line on B) and sew straight down the line to make the first tube.
- Repeat the last step for the next 2 tubes.
- Make the 4th tube by sewing the edges of A and B together.
- If all is good, you should see this:
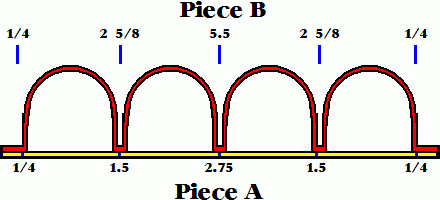
- Woot! now repeat the last stage all over again with piece C, but this time between the 14 and 23 inch marks.
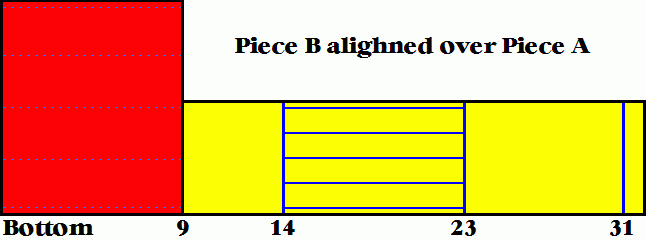
Sewing - The Final Touch
- So close!!! Ok, grab that piece of male velcro.
- Place it on piece A so that the top edge of the velcro lines up with your final line you drew at 31 inches.
- Zap-zap-zap (sew the 4 edges and an X) and your done!

Final Product Ideas
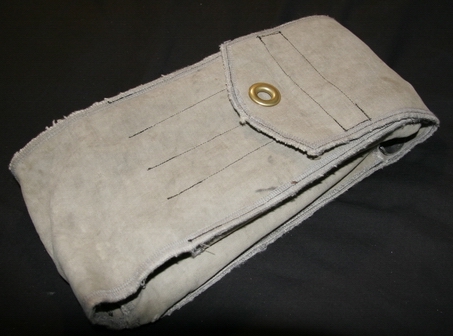
Some things that I or others have done, or talked about doing are:
- Cutting triangles between the male velcro and the top to make a point.
- Put a couple gromets below the male velcro and run some rope through.
- Replace all the velcro with a buckle.